CHQuilts

Wednesday, December 26, 2018

Finally


I have finally accomplished a major roadblock in my quilting life.

I have pin basted my unfinished quilt, my Garden Charms quilt, which has been lying around for more than a year. It was initially a Craftsy project, a class taught by Lynette Jensen.

I followed the pattern completely, except for picking my own colors. Finishing this quilt has been nagging at me for such a long time that I have been in such a quandary over it.
 

My quilting life had to take a backseat to my personal life—I have just had too many other responsibilities that have kept me from doing the activity I love. I’ve had a hard time getting back to it. 


  • The piecing gave me fits. I re-did several steps in this multi-step process. The pattern was complicated, but that is also what made it lots of fun to complete. I even made a table runner out of a couple of the pinwheel blocks to practice. It turned out great, so I was more comfortable with all those points. It came out imperfect, but not bad. I wrote about this in a previous post

  • Over a year ago I ordered eight yards of fabric for the quilt back. Until very recently, it remained in the bag in which it arrived. Finally, just a month ago, I measured it and cut it, sewed it, and turned it into my quilt back. 
  • The most challenging part of quilting for me is the small space for which I have to work. I watched several videos about laying out and basting the quilt in a small space for inspiration. Finally, the other day I bit the bullet, I cleared off my small dining room table, (a feat in itself) purchased a few small clamps to keep things taut, and some curved safety pins, and set out to pin baste this quilt. 
Alas, it wasn’t as difficult as I thought. This is the largest quilt I have ever attempted, so it was a bit unwieldy to put it onto my small dining table without wrinkles and without the constant help from my four cats.

I know it is going to be a challenge to machine quilt this quilt, but I am determined. I know I’m not the first to be intimidated by this. Most of the free-motion projects I have done have either been ‘quilt as you go’ projects or small pieces. The biggest quilt I’ve ever machine quilted was a baby quilt. That was a breeze, so I figure this is just like four of those, albeit attached.

I’m not sure when I will start this, but I’m getting rather excite. My next step is to take a picture of the various aspects of the quilt, print it out as a line drawing, and design quilting designs. I think I’m going to use all white thread, since the quilt is so colorful. Or, perhaps I’ll use hot pink, which might be fun. I’ll have to figure that out too.

I look forward to a subsequent post which will answer those questions and report on my progress. Wish me luck.


Sunday, December 9, 2018

I’ve always believed that quilting was good therapy. But as of late, I know it.

I’ve mentioned in previous posts that my husband had a debilitating stroke almost four years ago. He is now getting around in a power chair. I do love when he can wheel over to where I left the remote or can bring glasses into the kitchen when I just can't imagine leaving my comfy spot on the couch.

But, his illness has left more chores to do, so I am busier than ever before. And somehow, I’m not getting any younger. I have little time or energy for quilting, though I have two projects I’m anxious to work on. One is to be hand quilted; the other to be machine quilted, yet all three layers are not yet put together. My imagination has seen better days and it seems my creativity quotient is running in the negatives. I’ve even had some bouts with anxiety lately that exacerbate my fears of the ‘what-if’s’ and the ‘oh no, another birthday is coming around.’

I am making progress however. The other day I cleared off the dining room table, pitching all the junk mail out, and made a space to work with. I got took out the 8 yards of backing fabric that I ordered more than a year ago for my second project, a Craftsy quilt that is rather large. I pieced the backing fabric, and spray starched and ironed it along with the quilt top. They just need the batting, which remains rolled up in the closet. Oh, and then there is the dreaded basting. I’m not fond of this step, which is probably why I haven’t done it yet. I have only small spaces on which to work and I’ve yet to find a satisfactory way to get this done. I’m leaning toward spray basting, but I also just purchased some new curved safety pins.


I have also begun working on my hand quilted project, a Dresden Plate quilt that I started ages ago. I’ve found that hand quilting isn’t as easy as I remember. I think the multiple layers of those little wedges are a deterrent, but I’m convinced that I want this traditional quilt to be hand-quilted. In just one afternoon, I broke 3 needles. This is not the way I remember it.

But much to my surprise, I’ve found that physically putting the needle to fabric isn’t the only way to satisfy my quilting fix and relax my ever racing mind. In general, I’ve been watching quilting videos.

In particular, I’ve been watching The Quilt Show (TQS) hosted by Alex Anderson and Ricky Tims. I had not been acquainted with Ricky, but was a big fan of Alex through her work on “Simply Quilts,” her television series several years ago that inspired me to actually make my first quilt. I consider Alex Anderson to be a quilting mentor for me. Her hand quilting is wonderful and as a 30-year quilter, she is also a wonderful teacher.

I’m almost ashamed to say that even though I subscribed to TQS I had only watched a couple episodes.

One day I returned to the website, already listed as a favorite on my browser toolbar, only to learn that my current subscription had run out. I hurriedly renewed it and started watching the current episode. It had the same appeal that had always endeared me to Alex Anderson, except this time, I was so intrigued by Ricky’s approach to quilting. Not only is he a renowned quilter, but he is a musician who writes and performs the kind of music I love.

I found that as I binge-watched a couple episodes, I was feeling relaxed and even inspired by the wealth of information presented by so many quilt artists.

I began to watch shows whenever I felt the least bit stressed. I’ve started watching from the very beginning—in 2009, season by season. It is fun to see how far quilting has come and the myriad ideas that have and continue to shape the quilting world. Every now and then I will notice I’m watching a rerun of a show I’d already seen. No worries. It is always nice to brush up on skills, tips, hints, and trends. So even if I’m not doing as much quilting as I’d like, I still feel as though I have my hands in it, so to speak. So once again, Alex Anderson for leading the way for me. And Ricky, I love what he does as well. He brings a fresh, new, artistic approach which perfectly complements Alex’s more traditional work.

Watching TQS is no longer limited to those moments when I feel a panic attack coming on. I now watch just because I love it.

Friday, October 12, 2018

Quilting again, better with color

CHQuilts: double star block
Life is busy. And, it seems that sometimes it is just too busy to enjoy the things I really love, like quilting. I haven’t touched my sewing machine in way too long. I have a quilt in the works to be hand-quilted and one that just needs to be put together with backing and batting to be quilted. There just always seems to be something else more pressing to do. Ironically, that is the very reason quilting is so necessary. It soothes me, makes me happy, and keeps me somewhat sane.

Recently I decided to add some color to my kitchen. More info is available about this color choice at my personal blog at CHMusings.

What better project for a kitchen face-lift than a new table runner? I chose my new color in the kitchen to be turquoise, so I went through my fabric stash and picked out some fabrics. I have come to love this color and enjoyed working with it.

I decided to make the same table runner I have made many times before using the Double Star quilt block. I like to think of this as my signature block because I have made so many of them.

The table runner consists of three blocks, joined by a strip of sashing, with a similar border all around.


CHQuilts: double star quilted block
Rather than use my own pattern since I wasn’t quite sure where it was, and I was anxious to get started, I decided to just look for one online. Big mistake. There are several flying geese in this block and there are many different ways to make them. The pattern I downloaded used templates to cut and sew the pieces together. Have I mentioned before that I hate working with triangles? It may bear repeating. Although there was no waste involved in this method, the precision, at least for me, left much to be desired. I finished one block and was glad I didn’t cut out the pieces for all three, because I didn’t like the result. Haste does make waste. So, I decided to find the pattern I’m familiar with.
CHQuilts: turquoise table runner
I like the method, such as in this tutorial from Connecting Threads, which makes flying geese using squares sewn to rectangles and then trimming the corners. There is a bit of waste involved, but it is so worth it to have points match and end up with uniform pieces.

I became acquainted with this block during a Craftsy project, the 2012 Block of the Month. I loved making that quilt and fell in love with the Double Star.

Once I found the pattern, I cut out all my pieces and began to sew them together. It went much smoother this time around. In fact, I found it all to be pretty enjoyable. It was nice to be back into the swing of it. I’ve really missed working with my sewing machine. While a little out of practice, I like how the table runner turned out. I’m pretty happy with it. It adds just the right splash of color to an ordinary drab part of my kitchen.

Friday, September 14, 2018

I got lucky

I am a firm believer in luck, of being in the right place at the right time. And I hit the jackpot recently when I attended a local estate sale that advertised “fabric.”

I walked into an outbuilding, along with a huge crush of others, into what had clearly been used as a sewing studio at one time. Talk about a kid in a candy store. That is exactly how I felt. My vision was filled with dreamy colors: paisleys, plaids, stripes, polka dots, and solids. The studio contained numerous sewing machines, dozens of bolts of fabric, all neatly stacked in shelves along the walls. There were a number of bins filled with sewing notions from pins and needles to scissors and rotary cutters. There were yards of batting, cutting mats, and more. But most of all, there were boxes and boxes of fabric on tables, some sorted, some not. This was a fabric stash that was a quilter’s dream come true.

Normally when I buy fabric, I take my time, studying the colors, and thinking about various projects I might create. I try to visualize what is in my own stash, and what is lacking there. Yet, when I walked into this place, there wasn’t time to consider what I wanted. I just let it speak to me. I picked up what I liked with no thought to what I would do with it. There just wasn’t time for that. And, if I liked something and didn’t grab it, one of the others shopping there would have. So, I wasn’t even really aware of what I bought until I got home and spent some time with it, imagining what part it would play in future quilts. One of the first things I did was wind it onto cardboard in preparation for storage. I love
fabric and everything about it makes me happy.

I spent about $40 for material that would have otherwise cost hundreds and hundreds of dollars. This was a sale of a lifetime.

That said I would be remiss not to mention the downside.

I’m aware that my joy is related to someone else’s agony. I don’t know the story of what became of the person who owned that studio, the person who initially bought each and every yard of fabric contained there. I can’t even speculate. But it always makes me sad to realize that when someone’s household items are ‘liquidated,’ it is usually because someone died or was forced to move away.

I cherish each and every yard of fabric I have, but I respect this even more because of how it was obtained. I hope when the day comes that my children have to dispose of my fabric that it will be go to quilters. Quilters are very caring people, and they understand what our fabric means to us.

I’m anxious to start my next project.

Friday, March 2, 2018

Quilting is learning

Every quilting project is a learning experience. My latest one, an incomplete project, was no exception.

I actually wrote about this quilt –my calendar block of the month quilt--last month when I decided to finish it. http://chquilts.ozarkattitude.com/2018/01/pretty-doesnt-need-perfection.html I love doing block of the month (BOM) projects because they tend to keep me interested. Every month is a challenge. Because I started this in 2012, there were some real challenges for me because of some techniques I had never done before. I had never done paper piecing and hadn’t done too many appliques either. This had both.

This was the first BOM I ever did. I really enjoyed learning new techniques and practicing the skills I already knew. Piecing was difficult for me back then, as was matching seams and achieving perfect points. To be sure, I did neither in this project, but I did the best I could at the time. Thankfully, I have improved since then.

Although I loved making the individual blocks, I wasn’t so enamored with the quilt itself. It was smaller than I would have liked. It never occurred to me to add blocks or borders to increase its size. If I was to do another one like this, I would probably do both of those things. I thought this project had little cohesiveness. I was bothered that it all seemed so helter-skelter.

Now that I have finished it, I really like how it turned out. I am no longer “afraid” of all the colors in it. I’m pleased that it has a theme—months of the year-- which really is its cohesiveness. My thinking has evolved since I first looked at all these unrelated blocks. I’ve also grown in my color appreciation. I am no longer turned off by the many colors here.


Quilting the quilt

One of the hardest things to do for myself and many other quilters is to decide how to quilt the quilt. I’ve often heard it said, and I now agree, the quilt will tell you how to quilt it. I know how hokey this sounds, but it is true; the quilt will speak to you.

For example, I had no idea how I was going to quilt the February block.

I knew I wanted the cats to stand out. I was rather fond of this block because I happen to have four cats. So, I used a tiny stipple to make the background dense. I also densely quilted the hearts, so the cats themselves would come forward.

One of the cats had a seam that had come loose. So, I decided to quilt an outline around the heart shape, which in turn, would tame that seam. Worked out great. This remains one of my favorite blocks.


Another one that gave me fits was the July block. I decided to use a red, white, and blue variegated thread. Big mistake, but I didn’t learn until it was way too late.

The blue stars didn’t turn out quite like I wanted them too. The red and white portion of the thread shows up on the blue background, but the blue does not. The problem with the feathers was that the white portion of the thread just looked like an unquilted space. I decided to do what so many quilters tell you to do if you are unhappy with how something turns out. Just throw more thread at it. I did that and they look so much better without the blank spots. 

I had no idea what to do with those pesky bird houses depicting June. There were no holes for the birds to fly into, so that was the first thing I had to do. I wanted to quilt them all differently, so I looked at the fabric and let it tell me what to do. On the blue/yellow one, I quilted wonky lines, following the fabric grid. I did the same on the yellow roof. In order to add some cohesion to the block, I added diagonal lines for the background. So, all of them look like they belong together, but remain all different.

Another place I used the fabric print to guide the quilting was on the jar that is the September block. I’ve been asked what the significance of that is. I assumed the jar was chosen to depict jelly making or canning vegetables from the harvest. My quilt is mine though, so I chose my jar to be filled with bugs. It reminded me of catching lightening bugs when I was a little girl. The fabric has bugs on it. So, I simply drew circles around them, in a form of pebbling. I like how the texture turned out on this block.

And that was the approach I took to all of the blocks. I enjoyed thinking through some of these issues.

This was the biggest project I have made with free-motion quilting. Everyone says it can be done, so I wanted to prove to myself that I could do it. Normally, I do quilt-as-you-go project, where the quilting is done on each block and they are assembled afterward. This was done traditionally. Truthfully, I didn’t see any real problem with quilting the whole quilt. Oh, it did take a little more muscle to fit the bulk of the fabric in the tiny space, but it wasn’t as bad as I had anticipated. I’m no longer afraid of quilting a large quilt.

Sunday, February 11, 2018

Quilting is always on my mind

Toaster Strudel
While free-motion quilting is serious business resulting in beautiful pieces of art, I like to remind myself that it is also an enjoyable pastime. 

I never want to take myself too seriously, so I try to keep it light sometimes, which is why I prepare my morning breakfast--Toaster Strudel--with all kinds of swirls, squiggles, and potential quilting designs.

While a hearty breakfast often consists of a more healthy fare, there are just times when my sweet tooth wakes up and demands one of my favorite go-tos. So, why not?

There isn't much skill included in my breakfast design which caters more to my sense of humor than to actual quilting practice, but, that's OK too. 

I plan to work on my latest quilting project later this afternoon, but for now, clearly, quilting is on my mind.  

Sunday, January 14, 2018

Pretty doesn't need perfection

My latest quilting project is actually six years old--a quilt top I finished in 2012--a calendar quilt--with the 12 blocks representing each month of the year. Blocks were chosen by members of the Quiltingboard, an online quilter’s group that I joined just before starting this project.

This was my first Block of the Month (BOM) project, one of many I have done since. I love BOMs. Having something to quilt every month keeps me at my sewing machine and always gives me something to look forward to.

I admit that I was not really crazy about this quilt which is why it sat around for six years unfinished. But I am bound and determined to turn it into a pretty quilt.

It took me all these years to decide what to do with it. I admit I never really liked it. It is too small to put on the bed. I was never crazy about all those colors. And I thought it was rather busy for my taste. Frankly, it is not my best work either. 


I now recognize that perfection isn’t what makes a quilt pretty. And there is nothing wrong with lots of color, since it is all tied together by the black sashing strips. After all, it does have a theme to it. So, I’ve decided to enjoy this project for what it is. Never mind the wonky sashing strips or the less-than-perfect points. I am happy with the knowledge that this was an early endeavor and I’ve honed my skills since then. This can still be a very pretty quilt, once it is completed. Quilt tops are hard to judge anyway, because the quilting is where the magic happens. 

How bad can this be? Bug, alias Junior, our little 3-legged cat seems to like it. Funny she picked the October block to sit on. I suppose that block was meant to represent canning food from the harvest, but I used fabric with tiny bugs on my jar. It reminded me of catching lightning bugs when I was a little girl.
The more I think about this project, the happier I am to be finishing it. After all, it represents a few firsts for me. It was my first BOM. That first block for January used English paper-piecing, a technique I had never tried before. And this will be the first quilt I will free-motion quilt on my sewing machine that is bigger than a baby quilt. All of the others I have done have used the quilt-as-you-go method, whereby the blocks are quilted first and then sewn together to form the quilt. Because I’ve never worked on a whole quilt, I’m glad this is a small one. It will be good practice. I have another project waiting in the wings, a medallion quilt designed by Lynette Jennings previously mentioned in CHQuilts that I finished piecing last November. It is a Queen size quilt that I plan to free-motion quilt on my machine. 
     As I was cleaning my sewing area, de-linting my machine, and putting in a 
     new needle, as I always do before starting a new project, it started to snow. 
    his is an event in the Ozarks. What better way to enjoy this snowy day than 
    to quilt?

Today was a perfect day to begin working on this quilt. It marked the first time I touched my machine in 2018. I spray-basted the quilt top with its batting and backing fabric last week, so I was ready to start. Another first--I used my walking foot to stitch-in-the-ditch around each block and sashing strip. The quilt is now stabilized. So the fun is about to begin. Right now I have no idea what designs I will use in each block. I think I will figure that out as I go. I’m thinking I will use lots of colorful thread. I’m not afraid of color anymore. I’m getting a little excited. I think that despite the imperfections in this quilt, it is going to be pretty when it’s done.

Monday, November 6, 2017

MY quarter-inch seam took a licking, but kept on ticking


I need to work on my perfect quarter-inch seam. In spite of the challenges, I finally finished my first medallion quilt—thanks to this beautiful quilt designed by Lynette Jensen for a Craftsy class from last year. I mentioned this project in an earlier blog post.

At left is the quilt Lynette Jensen designed. At right is the actual quilt top I completed. There are so many reasons I wanted to make this quilt, but the most important was that I knew it would be a challenge. It was!

I chose different colors, but I followed every direction exactly as written. She did a beautiful job of explaining details, by the way. But, I will admit, I struggled with this one. I’ve always had a problem with anything to do with triangles. Of course matching points is always tasking. My biggest issue was the border in the center—the purple border in my quilt—which was a bear for me. It included sewing lots of tiny little pieces, including lots of squares cut into tiny triangles. Speaking of which, I had a few issues with the hour-glass shapes in the very center, for that very reason. But, I got through that after a few tries.

The purple border would not have worked if my life had been dependent on perfect ¼” seams or else. I’m not sure where my hang-up was, the sewing, the pressing, the cutting, or perhaps a little of all three. I made it work and if you didn’t know I varied a few seams to make it work, you would never know. I definitely went from below scant quarter-inch to way beyond chunky quarter-inch seams.

Because I was so bothered by this, I decided to make a little table runner out using the same pattern. I wanted to diagnose where my problem was. This is the result, at left.

I concluded that I have a long way to go to be as proficient at quilting as Lynette Jensen, but that gives me something to strive for. This is just a matter of practice needed. The points are good. The seams are all in the right places. It is definitely not perfect, but I can live with this. So, I guess the old adage still applies, practice, practice, practice.

Monday, October 23, 2017

Don’t go to a therapist; quilt

Chain-piecing can look like such a mess!
This weekend, I had a gaggle of flying geese to sew. Well, they weren’t exactly flying geese, but a quilt border that was similar. Sometimes I enjoy this mindless, repetitive chain-piecing work while other times, I get impatient and just want it to be done so I can move onto the next step. I’m happy to say the former worked for me on Sunday. I turned on the radio, to listen and even sing along to some of my beloved oldies. The rest of the time, I just let my mind wander.

Perhaps it is because I’m in the autumn of my life or perhaps it was the music that brought me back, but I thought about when I was a little girl, how happy, carefree and different life was back then. It was really nice not to have a care in the world. So, as I pressed my foot pedal and guided my squares under the needle, reliving that childhood experience. Right then, I felt no stress, no anxiety, no worry, just the mechanics of sewing.

At other times, I let my mind wander toward mistakes I’ve made, people I’ve known, or places I’ve lived. I thought about regrets. In 65 years, there are plenty of opportunities where it might be advantageous to go back to travel a different path, to think about the what if’s or the coulda, shoulda, wouldas. But what is the point of that? The unknown along a different path could have led to far worse consequences than any I’ve actually experienced. So, I’ve ruled out regrets. There is just no purpose for them. I’d much rather go about solving whatever problems come up along the way. I think that is more akin to my philosophy. And, I think I’ve done that. Perhaps I didn’t choose wisely at the time, but who knows? It all seems to have turned out alright; here I am, without a care in the world, creating something that hopefully, will be beautiful. What could be better?

From time to time, I would snap back to the present, and wonder, “How many of
The pile really does get smaller, I think???
these suckers do I have left?” I was reminded of the kids in the back seat asking, “Are we there yet?”

That was so annoying, I reasoned, so I dismissed my own question with the conscious thought, “There is still a huge pile. Just keep sewing.”

It was a rainy Sunday, one of my favorite kind of day for sewing. I was able to glance out the window behind my sewing machine as the raindrops bounced off the leaves of my plants. as my mind bounced back into the past. I remembered sitting in school on a rainy day, my feet cold from socks wet from old leaky boots. Turning my head caused my wet hair to tickle the back of my neck, giving me a quick chill. 


I remembered how just after the rain, my friends and I would ride our bikes through the puddles left behind. We had to hurry before the water soaked into the ground. We had to get up to speed quickly so we could glide through the water, our legs spread and our feet far from the pedals to protect them from the muddy water. Sheer momentum kept the pedals turning. Seems to me our feet always got wet anyway. Ah, such great memories.


Half-way there!
While I didn’t utter a sound, there was plenty of talking to myself. And before you know it, my pile of squares was all sewn onto their rectangles. Then, it was time to turn the pile and sew squares onto the other side of the rectangle. Good, there was time to have another meaningful dialogue with myself and more good things to conjure up from my mind chock full of happy times.

This is just one more aspect of quilting that I find invaluable. There are times when extreme focus is required, and yet, this activity is just the opposite. I enjoy both of these extremes, and this is just another reason I love quilting.

Thursday, September 28, 2017

Remembering Granny and her quilts

When I married my husband more than forty years ago, I married into a very talented family of stitchers. His mother crocheted and did a little quilting. But the star of the family was his grandmother, Mary. Everybody just called her Granny. I don’t think I will ever forget her.


Granny and Jenny
Granny with her Great-Granddaughter, Jenny
Granny was a quilter. Well into her 80’s, she would spend her time in the family’s dark, damp basement, lit by only a lone light bulb hanging from the rafters where her quilt frame was set up. It was just outside the fruit cellar and coal bin in the house her husband built. My husband tells me she would be down there for hours at a time. She did all her piecing by hand and turned out some beautiful quilts. As she aged and things became more difficult for her, she purchased quilt kits from places like Lee Wards Creative Crafts, which began in 1947. In the 70’s, it morphed into the modern and well-known Michaels.

Years ago though, I remember going to the Lee Wards in Elgin, IL. It was huge. To me it was like a kid’s first trip into Toys R Us. But this was not just a store; it was an immense warehouse, with aisle after aisle filled with every kind of art and craft imaginable. I wasn’t a quilter back then, but I did knit and crochet. Even today, I love yarn almost as much as I love fabric. Get me into a place like that now, I’d have to bring a sleeping bag.

Granny's quilt
Granny died in the early 80’s, but she lives on in our memory and of one of the quilts she gave us. Each of his siblings also has one. Ours was from a kit she liked to make. Once she cross-stitched the quilt top, she completed the quilt, hand stitching simple quilting designs.

I never actually saw her quilt; I only saw the result of her work. She eventually gave up quilting because she could no longer go down the steep stairs to the basement. She also complained about her failing eyesight.

Despite that, she never gave up working on her crewel embroidery. My mother-in-law, who was her caregiver, often bought kits for her. Often times she didn’t care what the finished piece was; she just enjoyed doing the work. The pieces often doubled as Christmas presents.

I had never seen anyone do such beautiful hand work. It is hard to believe that her eyesight was failing, given the beautiful stitches she could make. There was never any evidence of it in her work. It was flawless.

I recall how she used to sit on the edge of her bed, with her back straight as an arrow and her feet flat on the floor, as the sunlight streamed through her window and onto whatever project she had in her lap. She began sewing after the breakfast dishes were done and worked up until lunch. After the kitchen was clean, she took a nap, and sometimes sewed in the afternoon until the sun went down.

I can’t help but think that in the back of my mind, knowing her, planted the seeds of quilting into my own heart, only to sprout a little later in my life.

Wednesday, September 27, 2017

Quilting and cats just seem to go together

I have finally started hand quilting my Dresden Plate quilt, although there are
challenges. 
Quilting with Ryan
Quilting with Ryan

One of them, at right, is pretty obvious. Ryan just loves to be where the action is. She loves hanging out with me, for which I am oh-so-flattered. She is the greatest quilting supervisor, and she is always positive. I don’t think she has ever curled up on or under a quilt she didn’t like.

I can’t say that I mind either. I considered quilting to be an enjoyable activity, so a few cuddles from one of my favorite cats fits right in. Ryan is one of four and we have her mom too. For me, quilting is therapy and so is enjoying our pets.

Finishing this quilt will take months, so a few minutes here and there to bond with my girl won’t hurt a bit.

Thursday, September 21, 2017

Blogging, comments, and quilting


I love quilting and I love writing which is why I started blogging in the first place.

CHQuilts actually grew out of another blog, CHMusings, which is, as the name implies, all about the things I ponder, what matters to me, and all 
that I love in my daily life. No question, CHMusings is personal. It is for that reason that quilting was often times a topic. When it dawned on me that I was writing about quilting quite often, I decided to start CHQuilts.

Funny, one of the most read posts in CHMusings, is about quilting, entitled, “New way to mark the quilt.” Feel free to check it out by clicking the link. 
Marking the quilt has always been a sore spot with me. One day I decided to try a new technique I'd heard about using Glad Press & Seal. 

Most of the posts I write come from my own experience. I try to write about as many teaching moments, or should I say learning moments. I'm learning new things all the time, as a former city girl who lives in the woods after moving to the Arkansas Ozarks. I do believe I have found my niche here.

For the record, I also write two other blogs, CHBlog, which has a political bent and CHontrack, which showcases my interest in NASCAR, have lost some appeal for me lately. I’m sorry to say, they have been a bit neglected lately. I still write in them from time-to-time, but honestly, I’d prefer to spend my days quilting.

I’ve found that the more I learn about quilting, the more I want to learn. There are always new questions, new techniques, and new ideas. There will always be a new quilt inside my head. 

I’m not a professional blogger by any means, I just write about things that interest me, but the one post about marking the quilt seemingly has sparked some interest. I love it when folks make comments. I love the conversational aspect of quilting and blogging. And I love the constant flow of information. It comes in so many forms. Quilters are generally curious and caring. Quilters love to share, and learn from one another. Quilters are a complete inspiration to me. There are so many aspects to quilting that I love, but meeting other quilters certainly ranks high on that list.

So thank you to everyone who reads these posts; thank you to everyone that can relate in any way to quilting, and of course, those who comment on this and all other platforms from Facebook to the Quiltingboard to Craftsy pages, etc. I love the conversations. I love learning from you all, for you make me a better quilter.

Tuesday, September 19, 2017

Just trying to make a point

I’ve decided to begin a new quilt project—a medallion quilt taught by Lynette Jennings for Craftsy. I remember Lynette Jennings from watching "Simply Quilts," so I'm thrilled to be one of her students.

This was a free class offered as the 2016 Block of the month from Craftsy. Since I wasn’t able to participate when the class was first offered, I am glad to be able to catch up.

The hardest part about this quilt so far, is picking out the colors. There are a lot of them. I could have just purchased the kit, but isn’t that why I buy fabrics? It took a little while, but I think I have this all sorted out finally.

This quilt looks complex, so I’m really anxious to get started. I do love a challenge. The first class was to make the hourglass blocks in the center along with the first border.

I had a heck of a time with all those points and bulky seams. It occurred to me that I have spent so much time practicing my skills in piecing and cutting, that I have neglected part of quilting that is really helpful—the pressing.

As I was putting my rows of three blocks together, I could hear Lynette Jennings' words echo in my head, “Press the rows in opposite directions.” Unfortunately, I heard her voice only after I finished putting the entire center together. I was not happy with my results, so I decided to take apart all the pieces and sew them again, pressing each row in opposite directions. 


Here are the before and after photos:
BEFORE
AFTER

A big improvement! Clearly, the before and after show that this little exercise was well worth my trouble. And despite my husband telling me I’m crazy for ‘unsewing’ that entire middle section, I’m glad I did. Besides, that is just how I roll.

Friday, September 15, 2017

Spray basting, plan B

I admit it; I was pretty bummed about my first attempting at spray basting a quilt, detailed in an earlier post

But that is behind me. What I didn’t reveal, because I only realized it later, is how important it is to read directions. I had no idea I was supposed to finish the bonding process by pressing the piece. Needless to say, my failing to perform that all-important step, resulted in the layers not sticking together. Once I realized my mistake, I was a little bummed. Beyond my own foolishness was the knowledge that I had to spray baste the whole quilt all over again. I knew it would be even be more challenging this time, since I had already quilted an entire motif, right in the center of the quilt that I would have to work around.

I decided that working on the floor was just not an option this time around, so I cleared off the dining room table, put the leaf in it, and set out to flatten out my quilt, upside down. Of course the table wasn’t big enough to accommodate the entire quilt, but I moved it around, folded back some at a time to spray every little nook and cranny, keeping the back as wrinkle-free as possible. Then I pressed it, as it sat on the table. I’m sure that wasn’t good for the table, but a woman has to do what a woman has to do. I made sure I kept the iron moving and it didn’t appear to get too hot three layers down. Once the back was all sprayed and pressed, I worked to secure the quilt top to the bottom fabric and batting which was now one layer since it was stuck together. I walked around that table a gazillion times, folding, smoothing, spraying, smoothing again, and finally pressing. Finally, it was all done. When all else fails, read the directions. So for now, I’m a fan of spray basting. It is so much easier than all those darned safety pins or sewing.

My next challenge is to quilt with or without a hoop. I tried using a large oval hoop, but that was just too cumbersome. Then I dragged out a smaller round one, which was a definite improvement. But, it is actually so much easier to quilt without a hoop at all. Hand quilting got a little easier, once I got the feel of it again. I recently watched Alex Anderson of Simply Quilts and The Quilt Show fame as she spoke about learning to hand quilt. She said to give yourself about 20 hours to get comfortable with hand quilting. I’d say that is about right.

It will be more fun to quilt when it gets cold outside. There is nothing more relaxing than quilting and snuggling all at the same time. 

Monday, September 11, 2017

Accommodating my quilting bucket list

I’ve wanted to make a rag quilt for some time. I’ve also wanted to make a string quilt. Add to the mix, my desire to make a little quilted rug for my bathroom. I had a quilted rug before, but decided to use that as a table topper for my new file cabinet. So, I had nothing in front of the sink. That is no place for a naked floor, so I put all my bucket-list desires together and came up with a plan. 

This is the result. 


I took some leftover scraps from a yellow quilt, cut them into strips and made a few blocks. I got tired of that, and figured nine was enough, so I just alternated them with a few neutral yellow blocks. I made them all 6 ½-inch squares. Then I cut the same number of squares for backing, and a similar number of 5 ½ inch squares of batting. I placed all three together sandwiches together and sewed a simple “X” across them to hold them in place. I sewed a ½” seam between the squares.

 It was all done in one day. While watching TV that night, I snipped the seams, rather closely—in fact—close enough to make my fingers sore. I got it slightly wet and threw it into the dryer. The more I wash it the better it will look. For now though, it suits my purpose. I can’t wait to make a full size quilt with this simple method, but not until I invest in some ratchet scissors for all that snipping.

I have been saving old blue jeans just for this purpose. And, I have the cutest pink heart flannel to go with it. One of these days, I will actually get to it.

Friday, September 8, 2017

Quilting never ceases to amaze me

I just realized that one more aspect of quilting--one that I had never even considered--is how it has improved my writing.

No, I don't mean writing as in crafting a blog post, I mean my actual handwriting. I'm a handwriting fan, always have been and always will be. When I heard that some schools wanted to do away with teaching handwriting, I was livid. I think it is a vital communication skill that is also a well-rooted tradition. Imagine if John Hancock and other signers, simply printed their names on the Declaration of Independence. But that is another blog post in another blog. In fact, I already wrote it. https://rural01.blogspot.com/2012/07/cursive-writing-should-always-be-taught.html

But back to quilting. I've noticed that since I've been free-motion quilting, I have to consciously try to keep straight lines straight, without marking the fabric (because I hate to mark). I have learned to judge distance from seams and other lines of quilting; in essence training my eye. I used to be embarrassed about my writing, because it was always uphill. I compensated by always buying stationery with lines. 

I'm old enough to remember when we used to write letters to friends and family. I always loved to communicate, so I wrote lots of them. I used to receive many compliments on my penmanship. When I was in grade school, it was my best class. I remember once my mother-in-law had to send out thank you notes for some occasion. I was honored that she asked me to write them because she liked my writing. Personally, I don't think it is anything special, but I do enjoy writing, even though most of my writing is done on the keyboard now, like everyone else. 
grocery list

I did notice though, while writing a shopping list or addressing an envelope, or whatever I write, that I don't write uphill anymore. Oh, there is still a little hint of it, but not like before. By the way, please don't judge my handwriting skills from this tiny snippet. And by all means, don't judge my spelling skills here either. Who spells strawberries with only one "r"? 

Anyway, you get the point...This is just another reason to love quilting. 

Saturday, August 26, 2017

I spray-basted a quilt for the first time

chquilts: ready to quilt
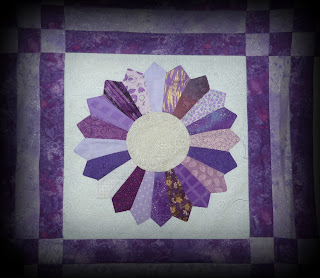
Ready to quilt my purple Dresden Plate quilt

I tried spray basting a quilt for the first time. Whoa, there has to be a better way. Or, I’m just not doing it right.

This exercise reminds me that when I said I loved every aspect of quilting, I lied. It isn’t a lie really, I’m just in denial about this part of the quilt making process. I have never been fond of this fundamental step-- putting a quilt top together with its batting and backing fabric—before the real fun begins. It is a very important step however.

I’ve tried several different ways and haven’t found one that doesn’t make me grit my teeth. I’ve used the traditional safety pin method, where I generally get aggravated or impatient or both, causing me to start skimping on the number of pins I use. I’ve tried Sharon Shamber’s method of rolling the quilt onto boards and then basting the three parts together a little at a time. She makes it look so easy. This is probably one of the best methods I’ve seen, but it remains timely and cumbersome with a large quilt in a small space, which is what I have to work with. This is why I wanted to try the spray basting method. I used 505 adhesive spray.

The only positive thing I can say about this step in the quilt making process, is that it is necessary. Without it, there is no process; There is no quilt. For me, that is just not an option. So, I will continue to grit my teeth.

While I recognize that perfecting this technique would be well worth it, this was just my first time spray basting. I do see the benefits. Admittedly, I struggled with getting all the layers smooth. I disliked all the on-the-floor, off-the-floor, on-the-floor that was necessary. I think hanging the quilt would make it much easier than rearranging all the living room furniture, shooing the cats away, and hoping I didn’t glue all my belongings together, not to mention the bending, stooping, and walking in circles. My only hope is to try Patsy Thompson’s method, which involves hanging the quilt and letting gravity help keep things straight. I will try that next time.

Spray basting was only part of my problem

This is also the first time I used an oversized backing fabric. I had picked out a fabric that I already had, but didn’t really like it. I decided to purchase a nice piece of lavender print that was 104” wide. I bought four yards of it.

I have been looking at this quilt for some time, actually. It was started ages ago. As outlined in a prior blog post, initially I wasn’t happy with it. It was square, so I enlarged it, adding an entire row with four brand new blocks, all the sashing and cornerstones. I was amazed how well that worked. If you didn’t know, you wouldn’t know. Then I decided I wanted to add the final border. I love how that turned out. It makes the quilt about the right size and in my mind, sets off the pattern nicely. But working with all that fabric was a headache.

First I got out my iron and ironing board. Yikes! By the time I pressed the last of it, the first part was already wrinkled. I just looked at it for a few days, wondering what to do next. I laid out the back, unrolled the queen sized batting on top, then added the quilt top. There was lots leftover. I trimmed away some of it, which helped a little. The table I was working on was always adequate in the past. I’m not sure why it was such a struggle this time, but it certainly was. Finally, I folded the would-be quilt, with all three pieces and left them for a while. I had to figure out what, where, and how to get this thing basted.

Finally I decided Friday night was it. Tired of looking at this pile of pretty purple fabric, I want to start quilting again. I decided the living room was it. I vacuumed. I moved all the furniture. I used painter’s tape to secure the corners and the middle of the backing fabric. Of course the tape didn’t stick to my vinyl flooring. I did the best I could though and spray basted one half at a time, first the top to the batting, then the batting to the backing. Then the other half. I did the best I could. Finally, I was able to slide a quilting hoop into the middle and secured it into place. Just the look of a quilt ready to be quilted is comforting to me. I placed the quilt hoop onto a wooden snack tray. The quilt drapes onto the floor, but should stay in relatively good form. Ryan, my cat loves new quilts, so I placed a towel on it to protect it from cat hair. Ryan is now its guardian.

I’ve decided to hand-quilt this quilt. I think the traditional pattern deserves traditional quilting. I’ve already taken a few stitches. Oh my, this is not comfortable. I am very rusty. I will need lots of practice, but that will come. I started by drawing a spiral into the middle of one of the Dresden plates. Wow, this is harder than I remembered. So much for quilting being a relaxing activity. Right now, I’m tense, the lighting is terrible where I’m working, my stitches are not uniform, and I definitely need to find my rhythm. That will come. Now, I’m ready for those cold, winter nights. Bring it on!

Sunday, August 6, 2017

Lone quilter

People often ask me if I belong to a guild or quilting group. Sometimes they look at me funny when I tell them, no, I’m a lone quilter.

While I’m not averse to the social aspects of quilting in a crowd, lone quilting is more than an activity to me; it is a philosophy. I think of quilting as a form of meditation. It is an activity that allows for deep personal thought. It is therapy. I find I am very busy these days and juggle lots of responsibility. There is seldom enough time in the day to accomplish all that needs to be done, so often times, I don’t even try. I am not the kind of person that frets over a sink full of dirty dishes. I figure they will wait for me. I always get around to the chores that need doing, but I get around to them on my time.

Quilting is one activity I want to make time for. It is a kind of precious gift I give to myself, not unlike baking myself a birthday cake. I relish the alone time, feeling free, as my mind wanders wherever it wants to go.

I am a self-taught quilter who enjoys learning new things, especially something creative that inspires me. And though I’ve been quilting for nearly 20 years, I still consider myself a newbie. There is so much to learn, to try, and to practice. This type of learning requires deep concentration, where all my faculties can engage with little distraction.

But just because I don’t physically go elsewhere to work on a quilt, that doesn’t mean I don’t belong to quilting groups. In fact, I do belong to several on the computer. Modern quilting allows the best of both worlds--lone quilting and social interaction. Internet quilting groups are great for advice, counsel, and camaraderie. Online sources also offer nearly endless learning potential.

Ironically, one of the most inspirational aspects of quilting for me, is its rich history. The quilting bee was a huge part of the history of quilting; its root remains relevant today in various guilds and church groups. I have always been drawn to stories about brave American pioneer families who traveled west to seek a better life. Quiltmaking was a huge part of the American story in the late 18th and early 19th centuries. Quilting was a social activity for women of the day, but moreso, handmade quilts were a necessity for survival during long, cold winter months. Women’s use of fabric from worn out clothing and livestock feed sacks was necessary for their survival.

Socialization with other women, as well as the need to finish sewing together the pieces of cloth that would warm their families, was probably as psychologically necessary to pioneer women as lone quilting is to me today.

Quiltmaking has gone through such evolution. No longer strictly functional, the modern quilt story is much more complex. Traditional function remains one of its amenities, but quilts today represent everything from a way to earn a living to the creation of fine art. Quilts come in various sizes, from huge bed quilts to table runners, wall hangings, and candle pads. They use design and color in new ways as well. Modern quilts range from the traditional log cabin, bear paw, and churn dash quilt blocks to the complex computer-drawn star points. There are also new uses of a variety of fabric and thread. The creations are limited only by their creator's imagination and skill.

There is no end to the inspiration, which is largely what intrigues me the most. I want to make a rag quilt, a one-block wonder, bargello, art quilts, and so much more. I want to improve my paper-piecing techniques, and learn new free-motion quilting designs, as well as hone my skills on those I’ve already done. I want to return to hand-quilting, and further experiment with color.

I finished my first quilt in 2003. I have made many more since. I knew then that I loved quiltmaking and I would be a quilter for the rest of my life. My quilting journey has shown me there is no end to this creative process. Every new idea brings about an endless stream of new ideas, limited only by our own imagination.

While I will likely never go to a quilting group, I do belong to several virtual groups. The computer is another tool that has enhanced the quilting experience. I have learned so much because of the ability to watch other quilters on videos. I owe each of them a debt.

Tuesday, July 18, 2017

I'm happy now


I like how this quilt is going to turn out. It should be named for Goldilocks, as it will end up being ‘just the right size.’

There is still another border I want to put on it, just to finish it off. I am thinking a darker border; my husband thinks a lighter one. Then again, I may just leave it as is. I like it, so I will just have to audition a few fabrics to determine if I like it better with another border, or not. There are no time constraints on this project, so I will have to simply ponder my options.

Pondering my options is, for me, the most challenging part of quilt making. It is also my favorite. I am definitely a pro-choice quilter.

I’m already so glad I decided to fix this quilt top. It would have been too small, at only four squares wide and four long.

I defy anyone to pick out which row I just added to this quilt top, which has been sitting around unfinished since 2015.
While it was only one row, it turned out to be a bit more than I bargained for.

I had to do a little unsewing. There were some decisions I had made early on that I no longer recalled, like making the center circle of the Dresden an alternate color. I had to review how to applique a perfect circle, since I forgot how to do it.

I initially made the sashing and sewed it on without the cornerstones. I had to rip it out. Then I made the cornerstones, five in all, wrong. I reversed the colors, so I had to rip those out too. Fortunately, much of the fabric from my blunders was reusable. It was just a matter of getting it right.

Once I make the decision on the final border or no border, I will add backing and batting and it will be time to quilt.

Finishing this will probably take at least a year, if I decide to quilt it by hand. I’m starting to rethink that decision, at least partially. There are lots of seams in this quilt, which makes hand-quilting a challenge. Not only that, but I haven’t quilted in years. It will take some time to get regulate my stitches and be comfortable with the tiny needle that I’m no longer used to. The light lavender in the sashing and cornerstones has a silver fleck to it, making it heavier than the other fabrics. That might make for some tricky quilting by hand as well. The solution may be to combine both hand and machine quilting. The time frame will likely remain unchanged because I want to hand-quilt. There is nothing more satisfying than a cold winter’s day with a quilt hoop draped on my lap, a cat or two, or more hanging around, as I work my needle back and forth through the layers of a quilt. It doesn’t hurt that I like this quilt and will enjoy working on it.

Monday, July 17, 2017

Organization and efficiency combine to get things done

Being organized is great on its own. Not only does it add to efficiency, but I’ve found recently that it also will allow me to finish what I’ve started.
CHQuilts: purple Dresden Plate quilt

I began this quilt a couple years ago—a purple Dresden Plate quilt.

I wasn’t sure what I wanted to do with it. I had toyed with the idea of hand-quilting it rather than quilting it on the machine. Since it is a traditional design, I thought traditional quilting would be fitting.

Not long ago, I unfolded it and was a bit surprised that it was a square, rather than a rectangle. I was bothered by that. I have no idea why I did that.

For a few weeks, I have been thinking about this, wondering if there was enough fabric to finish one more row. I know I had all the material in a plastic container that had been used for this quilt. I hadn’t done anything with it when I was organizing my stash recently.

Without actually really looking in the box, I figured there probably wasn’t enough fabric to add another row. I reasoned that since I had planned to add a border around it in a darker color anyway, I could simply add two borders on the top and bottom with one along the sides. That wasn’t an ideal solution, but it would make the quilt rectangular.

Since I had recently finished my baby quilt, and had a “clean” quilting space, I finally decided to open the box. I was surprised to see enough leftover fabric to finish four more blocks. Not only were there large pieces of fabric, but there were also several of the 4” fan blades or wedges, already cut. One “plate” consists of 20 wedges, which means I needed 80 of them. There may have been that many, although there were only quantities of about 15 different fabrics. I wanted no duplicates, so cut a few more to make up the difference.

In the box, there were also several squares of the background prints--alternating white-on-white and white-on-cream paisley prints—already cut.

The only thing left was to check out the sashing fabrics.

This is where the organization comes in. Since I had just “filed” my fabric by color, into cube shelves, it was simple to take a quick peek. I pulled out just what I needed in minutes.

I have been busy the last couple days, sewing the Dresdens together and hand-stitching them onto the background fabric. The four new blocks are almost completed. Hand quilting this quilt will be a marvelous project this winter.